These functions are essential for creating sketches and controlling your Arduino projects:
| Function Name | Description | Example Usage |
|---|---|---|
setup() | Initializes the Arduino board and runs once at the start of the program. | cpp 1 void setup() { 2 Serial.begin(9600); 3 // Other initialization code here 4 } |
loop() | The main loop that continuously executes after setup(). | cpp 1 void loop() { 2 // Your main program logic here 3 // For example, read sensors, control actuators, etc. 4 } |
digitalRead(pin) | Reads the digital value (HIGH or LOW) from a specified digital pin. | cpp 1 int buttonState = digitalRead(2); // Read from pin 2 2 if (buttonState == HIGH) { 3 // Button is pressed 4 } else { 5 // Button is not pressed 6 } |
analogRead(pin) | Reads the analog value (0-1023) from an analog pin (A0 to A5). | cpp 1 int sensorValue = analogRead(A0); // Read from analog pin A0 2 // Use the sensor value in your code |
digitalWrite(pin, value) | Sets the digital output value (HIGH or LOW) on a specified digital pin. | cpp 1 digitalWrite(13, HIGH); // Set pin 13 to HIGH 2 delay(1000); // Wait for 1 second 3 digitalWrite(13, LOW); // Set pin 13 to LOW |
analogWrite(pin, value) | Generates a PWM signal on a specified pin (usually used for dimming LEDs or controlling servos). | cpp 1 analogWrite(9, 128); // Set PWM duty cycle to 50% on pin 9 2 // Use analogWrite for LED brightness control, motor speed, etc. |
Table with examples of common control structures in programming, including if, else, and while loops.
| Control Structure | Description | Example Usage |
|---|---|---|
if | Executes a block of code if a specified condition is true. | cpp 1 int temperature = 25; 2 if (temperature > 30) { 3 Serial.println("It's hot!"); 4 } else { 5 Serial.println("It's pleasant."); 6 } |
else | Provides an alternative block of code to execute when the if condition is false. | cpp 1 int age = 18; 2 if (age >= 18) { 3 Serial.println("You're an adult."); 4 } else { 5 Serial.println("You're a minor."); 6 } |
while | Repeatedly executes a block of code as long as a specified condition remains true. | cpp 1 int count = 0; 2 while (count < 5) { 3 Serial.print("Count: "); 4 Serial.println(count); 5 count++; 6 } |
for | Combines initialization, condition, and increment/decrement in a single line for loop iteration. | cpp 1 for (int i = 0; i < 10; i++) { 2 Serial.print("Iteration: "); 3 Serial.println(i); 4 } |
switch | Allows you to choose between multiple code blocks based on the value of an expression (usually an integer). | cpp 1 int dayOfWeek = 3; 2 switch (dayOfWeek) { 3 case 1: 4 Serial.println("Monday"); 5 break; 6 case 2: 7 Serial.println("Tuesday"); 8 break; 9 // ... other cases ... 10 default: 11 Serial.println("Invalid day"); 12 } |
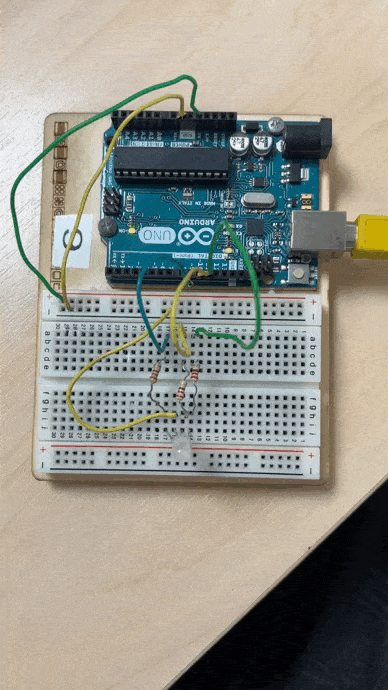
LED Blinking
1x Single Colour LED
1x 330 om Resistor
3x Wire
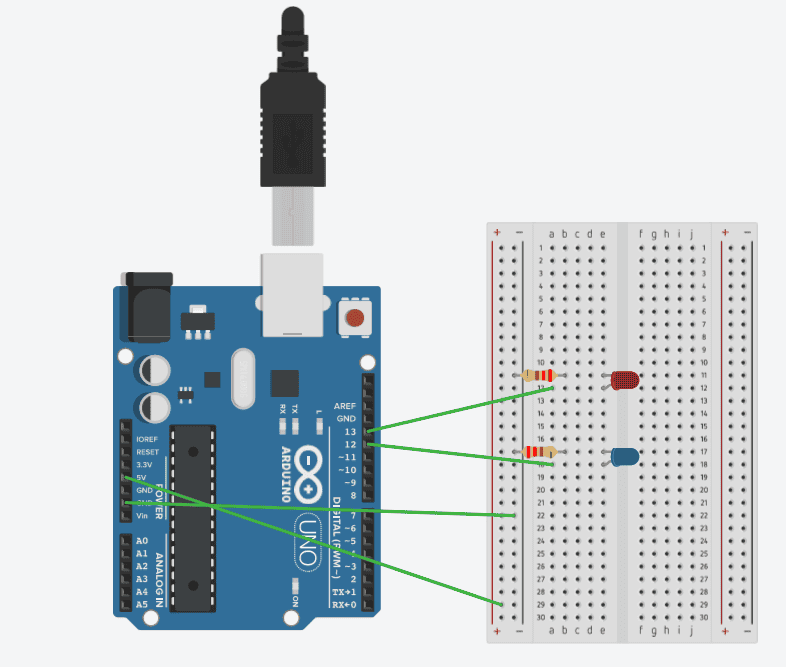

Arduino blink code
// C++ code
//
const int LED=13;
const int LEDB=12;
void setup()
{
  pinMode(LED, OUTPUT);
  pinMode(LEDB, OUTPUT);
}

void loop()
{
  digitalWrite(LED, HIGH);
  digitalWrite(LEDB, LOW);
  delay(1000); // Wait for 1000 millisecond(s)
  digitalWrite(LED, LOW);
  digitalWrite(LEDB, HIGH);
  delay(1000); // Wait for 1000 millisecond(s)
}
RGB LED
1x RGB LED
3x 220 Ω Resistor
6x Wire
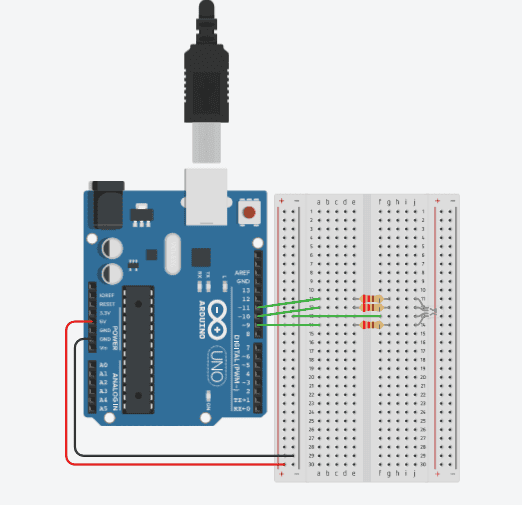
Arduino code
const int RED_PIN = 11;

const int GREEN_PIN = 9;

const int BLUE_PIN = 10;

int DISPLAY_TIME = 100;  // värvimuutuse kiirus

void setup()

{

  pinMode(RED_PIN, OUTPUT);

  pinMode(GREEN_PIN, OUTPUT);

  pinMode(BLUE_PIN, OUTPUT);

}

void loop()

{

mainColors();

//showSpectrum();

}

void mainColors()

{

// Kõik LEDid on välja lülitatud

  digitalWrite(RED_PIN, LOW);

  digitalWrite(GREEN_PIN, LOW);

  digitalWrite(BLUE_PIN, LOW);

 delay(1000);

//Põleb punane

  digitalWrite(RED_PIN, HIGH);

  digitalWrite(GREEN_PIN, LOW);

  digitalWrite(BLUE_PIN, LOW);

  delay(1000);

// Põleb roheline

  digitalWrite(RED_PIN, LOW);

  digitalWrite(GREEN_PIN, HIGH);

  digitalWrite(BLUE_PIN, LOW);

  delay(1000);

// Sinine on sisse lülitatud

  digitalWrite(RED_PIN, LOW);

  digitalWrite(GREEN_PIN, LOW);

  digitalWrite(BLUE_PIN, HIGH);

  delay(1000);

// Kollane.

  digitalWrite(RED_PIN, HIGH);

  digitalWrite(GREEN_PIN, HIGH);

  digitalWrite(BLUE_PIN, LOW);

  delay(1000);

// Lilla

  digitalWrite(RED_PIN, LOW);

  digitalWrite(GREEN_PIN, HIGH);

  digitalWrite(BLUE_PIN, HIGH);

  delay(1000);

//Roosa

  digitalWrite(RED_PIN, HIGH);

  digitalWrite(GREEN_PIN, LOW);

  digitalWrite(BLUE_PIN, HIGH);

  delay(1000);

//Valge ehk kõik on sisse lülitatud

  digitalWrite(RED_PIN, HIGH);

  digitalWrite(GREEN_PIN, HIGH);

  digitalWrite(BLUE_PIN, HIGH);

  delay(1000);

}

// Vikerkaar.

void showSpectrum()

{

  int x;

  for (x = 0; x < 768; x++)

  {

    showRGB(x);  //

    delay(10);   // paus 0,001 sek

  }

}

// ShowRGB()  põhivärvid:

// 0 = punane

// 255 = roheline

// 511 = sinine

// 767 = jälle punane

void showRGB(int color)

{

  int redIntensity;

  int greenIntensity;

  int blueIntensity;

  if (color <= 255)

  {

    redIntensity = 255 - color;    // lülitakse välja punane

    greenIntensity = color;        // lülitakse sisse roheline

    blueIntensity = 0;             // sinine on välja lülitatud

  }

  else if (color <= 511)

  {

    redIntensity = 0;                     // punane on välja lülitatud

    greenIntensity = 255 - (color - 256);

    blueIntensity = (color - 256);

  }

  else if (color >= 512)

  {

    redIntensity = (color - 512);

    greenIntensity = 0;

    blueIntensity = 255 - (color - 512);

  }

  analogWrite(RED_PIN, redIntensity); // punase LED´i sujuv ümberlülitamine

  analogWrite(BLUE_PIN, blueIntensity);

  analogWrite(GREEN_PIN, greenIntensity);

}
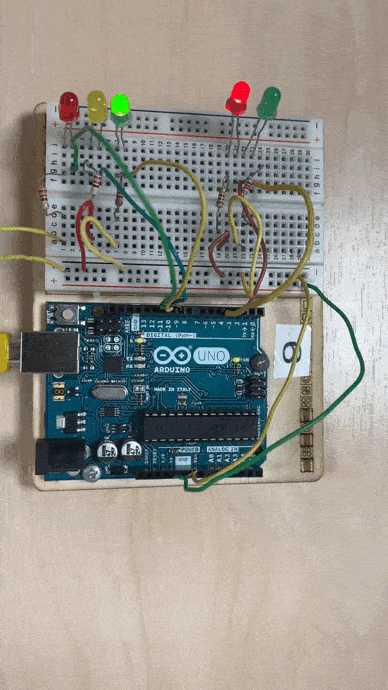
LED Traffic Light
2 x RED LED
2 x GREEN LED
1 x Yellow LED
5 x 220 Ω Resistor
12 x Wire
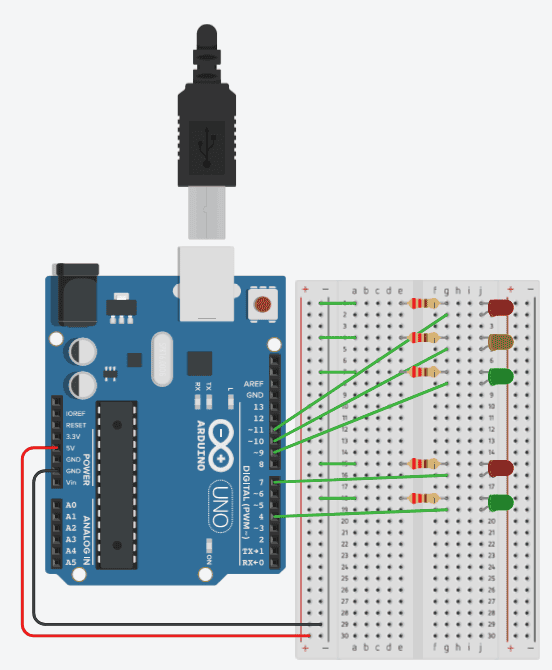
Arduino Code
// Подключение пинов светодиодов
const int CARRED_PIN = 11;
const int CARGREEN_PIN = 10;
const int CARYELLOW_PIN = 9;
const int HUMANRED_PIN = 3;
const int HUMANGREEN_PIN = 4;

void setup() {
  // Настройка пинов как выходы
  pinMode(CARRED_PIN, OUTPUT);
  pinMode(CARGREEN_PIN, OUTPUT);
  pinMode(CARYELLOW_PIN, OUTPUT);
  pinMode(HUMANRED_PIN, OUTPUT);
  pinMode(HUMANGREEN_PIN, OUTPUT);
}

void loop() {
  // Дневной режим (цикл)
  for (int i = 0; i < 5; i++) {
    // Светофор для машин
    digitalWrite(CARYELLOW_PIN, HIGH);
    delay(2000); // Ждем 2 секунды
    digitalWrite(CARGREEN_PIN, HIGH); // Зеленый свет
    digitalWrite(CARYELLOW_PIN, LOW);
    digitalWrite(CARRED_PIN, LOW);
    delay(5000); // Ждем 5 секунд

    digitalWrite(CARGREEN_PIN, LOW);
    digitalWrite(CARYELLOW_PIN, HIGH);
    delay(2000); // Ждем 2 секунды

    digitalWrite(CARYELLOW_PIN, LOW);
    digitalWrite(CARRED_PIN, HIGH);
    delay(2000); // Ждем 2 секунды

    // Светофор для пешеходов
    digitalWrite(HUMANGREEN_PIN, HIGH); // Зеленый свет
    digitalWrite(HUMANRED_PIN, LOW);
    delay(5000); // Ждем 5 секунд

    digitalWrite(HUMANGREEN_PIN, LOW);
    digitalWrite(HUMANRED_PIN, HIGH);
    delay(2000); // Ждем 2 секунды

  }
}